
This page is the quickest way to get started with Layout Master. We give a brief overview of the process of working with the application to create page layouts, as well as the major features of the application. You can then fill in your knowledge of Layout Master using our manual, and our hands on tutorial.
Using Layout Master to create web page layouts is very straightforward. You simply need to
Simple.
Read on, as we cover each of these steps in detail. In about 5 minutes you'll have your first layout up and running.
Simply running the application creates a new layout. The untitled window open when you run the application is your layout window. Creating additional layouts is easy.
To create a layout
1. choose (cmd + N) from the menu
A layout window opens

So what is a layout? A layout is an HTML document, to which you add positioned elements. If you want to learn more about what a positioned element is, see our Layout Master manual.
Once we have our layout, we need to add positioned elements to it. That's what we'll do now.
The heart of a page layout are positioned elements. These are HTML containers for text, images and other content. Lets create our first positioned element.
To create a positioned element
1. choose from the menu
A positioned element is added to your layout. Here is what is will look like.
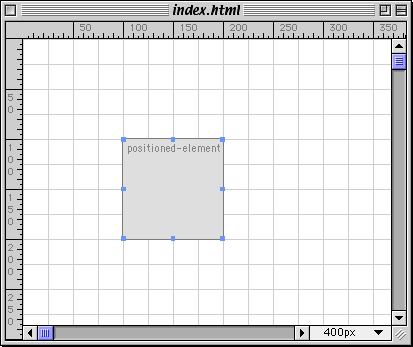
The text in the element is the element's name. This view of the layout we call the "wireframe" view, because we only see the outline of the element. We can also see its content, using the WYSIWYG editing mode.
To change to WYSIWYG editing
1. choose from the menu
You can drag this element around to position it, and drag one of the colored handles to resize the element. A little later, we'll take a look at using Layout Master's editors to edit the size, location, content and other properties of a positioned element.
Often, you'll have text, HTML or images you'll want to insert directly as a positioned element. With Layout Master this is very straightforward.
To insert HTML, text, or a gif, png or jpeg image as a positioned element
1. choose from the menu
2. locate the file whose content you want to insert as a positioned element
A new element is created with this as its content.
Rather than simply relying on dragging and dropping to edit the location and size of a positioned element, we can use Layout Master's editors to do this. We can also use these editors to edit the content of an element, and its background and borders, as well as other, more advanced properties discussed in detail in the tutorial and manual.
To open the editors, which are contained in different tabs of the same editor window, choose one of the editor buttons from the launcher.
For the Location Properties editor, click ![]()
For the Content editor, click ![]()
For the Background and Border Properties editor, click ![]()
To edit the location or size of a positioned element, we use the location tab of the element properties editor.

At the top of the editor, the Name field lets you give the positioned element a name.
Below this is the kind of positioning you want to use for the element. Mostly you'll use "absolute" positioning. For more on this, see our manual.
In the location tab, you'll find editors for the top, left, width, height, z-index and visibility of the element. For more on these properties and what you do with them, see our manual. As you might be able to guess, you can simply enter values in the various editors to change the position and size of the element.
As positioned elements are HTML elements, they can contain all kinds of HTML content. Mostly, we recommend you use your favorite text of HTML editor to edit the content of your elements. However, it can be useful to do this inside Layout Master. To edit the content of an element, we use the Content tab of the Element Properties editor.

To edit this content, you'll need to be familiar with hand coding HTML. If you would like to learn more about hand coded HTML, Western civilisation has a self paced course that covers the core of HTML. See our self paced courses for more information.
With Layout Master we can also edit the background properties of an element (giving it a color, or an image) as well as the border of an element. We do this using the Background and Border Properties editor.

To give an element a background color
1. enter the color value in the color field
or
1. click the color square to the right of this field
2. choose the color you want using the system color picker
To give an element a background image
1. enter the url for the image in the url field
or
1. choose in the popup menu to the right of the field, then
2. locate the image file to be used as the background image.
To give an element a border
1. choose a border style from the popup menu
2. optionally give the border a width using the width editor (by default, the width is medium)
3. optionally, give the border a color (by default, it is the same as the text color for the element)
You can see how straightforward it is to give sophisticated layout and effects to an element using the editors, and without knowing anything about the underlying HTML and CSS!
Because the background of a page is often such an important part of the page layout, Layout Master has editors which let you edit the background properties of a page.
We edit these properties with the Page Properties editor.
To open the Page Properties editor
1. click the ![]() button in the launcher
button in the launcher

You'll find this editor quite similar to the background and border editor we saw a moment ago.
At the top of the editor, you can give the page a title.
Below this, you can give the page a background image or color, just as we did for positioned elements. There are also a couple of extra options for background images, which we detail in our manual.
Again, you'll find editing the background of a page very straightforward using Layout Master.
Because your layouts are of course designed to end up in browsers, you'll want to preview them as you work in Layout Master. When you first run the application, Layout Master goes looking for all the most common browsers installed on your system. You can then use the preview feature of Layout Master to preview in one or all of these.
To preview the current layout in a browser
1. in the Preview menu, go to the submenu titled Preview in Browser, and choose the name of the browser you want to preview in
If the browser you want is not there, our manual explains how to add browsers to this menu.
If one or more of your selected preview browsers is running, then clicking the preview button ![]() on the launcher previews the current layout in any of those browsers.
on the launcher previews the current layout in any of those browsers.
Because Layout Master is not designed to be your only web development tool, but rather work well with all your tools of choice, we've made it easy to edit the current layout with your other development tools, using the Edit With feature.
When you first run the application, Layout Master finds the most recent copies of DreamWeaver, GoLive, BBEdit and Style Master on your system, and adds them to the submenu of the menu. You can also add your favorite tools to this submenu. See our manual for details.
To edit the current layout with one of these "Helper Apps"
1. choose the name of the helper app you want from the Edit with submenu of the File menu
This open the front layout in the application you chose. When you've done editing it there, close the layout, saving any changes, and bring Layout Master back to the front. Layout Master senses any changes, and asks you whether you want to update the layout. Easy.
Just note that most other applications won't automatically sense changes to a layout while they have them open. so if you have a layout open in both Layout Master and another application, there is the potential for the other application to save changes over the changes you've saved in Layout Master! To be safe, always close a layout in other applications while working on them in Layout Master, but it is fine to keep them open in Layout Master while working on them in those other applications.
Now its time for you to really get to grips with the application. We suggest you start with our hands on tutorial, which covers all of this guide and more in hands on detail. By the end of it you'll really be up to speed with the application. If you prefer to go into technical detail, you might try our manual, which details each and every aspect of the application. Or, just jump straight in. A lot of developers find it very easy to get started that way.
Thanks for downloading Layout Master. We trust that the application really useful in your web development endeavors. If so, we wouldn't mind at all if you purchased the application. Its only $49.99. For details on how to purchase, the benefits of doing so, and special offers we have, see Buying Layout Master (it's on your hard disk).
Thanks again